When I picture the windows open in a room, I imagine warm sunshine streaming through as the wind gently blows the curtains. Fresh air hits me and I am compelled to take a deep breath. The refreshing energy fills my soul. Of course there are only certain seasons when it's practical to open the windows, but my goal is to fill my heart, home, and family with a beautiful serenity that always makes me think the windows are open!

Thursday, June 24

Little Girl’s Room Wall Art and Reveal

Okay, so now that I’ve finished the painting, trimming, stenciling, and curtains in my little girl room,  I’ll show you some simple wall decor I did.  Then, I’ll do a quick room reveal from start to finish.  I love the peacefulness of the lavender colors in this room.  To be honest, some days when the little ones are napping, I go sit in there and just enjoy the serenity.

On the walls I wanted to put verses from Proverbs 31 to  inspire my daughters to be kind, loving and God-centered women.  But when I priced custom vinyl lettering… OUCH!  I could MAYBE afford one, but not all eight that I wanted to do.

Here’s my creative and much MUCH cheaper solution.  For under $15 I purchased a package of 10 clear, full sheet labels from Amazon.

label paper                


They work in an inkjet printer, so I picked my favorite font,  Pavane, and designed my verses to fit on an 8.5 X 11 inch paper which I then cut out.  Here’s the end result.

KindHearted

Charm

I ended up printing 7 of them.  The last one I printed on Sew-In Computer Printer Fabric that I got at Jo-Ann’s a while back.


label paper 


With a coupon, it was less then a dollar per fabric sheet.  Then I sewed the fabric sheet into a pillow.

 pillow


And now to reveal the room redo from start to finish…. Drum roll please…

Original Wall Color origWall2
 

Lavender Paint in Two Tones shown here

 paintedwall1crop paintedwall2crop

Chair Rail Added shown here

rtrim1

Stenciling Completed shown here

stenciling1 stenciling2


Curtains Sewn & Hung shown here

ucurtain2


And last, the completed room:  Bible versus on the wall. Furniture moved back in place (I would LOVE new furniture, but alas, that’s not in the budget);  My favorite quilt and pillows on the bed (I made these years ago).  When my little one is ready to come out of the crib, we’ll put rails on the bed and move her in.  Until then, Grandma and Grandpa still have a place to sleep.   :o)

zfinished1

Hope you enjoyed it.  Have a great day!

Rebecca

Joining the party at:

CreativeShareWednesdays


Wednesday, June 2

Simple Way to Transpose a Baby Sleeper

I hope everyone had a wonderful Memorial Day weekend.  And a big thank you to all the men and women who have served our country, especially my husband, father, and uncles.

This is such a simple redo that I almost didn’t share it on here.  But then I realized that no repurposing project is too small to capture somebody’s attention and inspire them.

finished

When I was pregnant with my first, we knew it was a boy, but still tried to buy neutral baby colors since we intended to have more children.  Let’s face it, baby stuff is expensive!  I didn’t want to re-buy EVERYTHING just to get girl colors if we had a girl next.

Well, indeed, our next two are girls.  And for the most part it’s been easy to exchange the blue blankets in the nursery with pink blankets and dolls to make it look girly.  But one purchase I made on EBAY before my son was born was a blue co-sleeper.  I got a great deal on it, but since it was pre-owned I couldn’t choose the color.  Blue worked fine for my son and we didn’t actually use it much for my first daughter, but now we use it a lot with the second daughter since the first is still in the crib.   Long story short, little girl #1 is not ready for a toddler bed so she’s staying in the nursery crib for a while and baby girl #2 is going into the big girl room with the co-sleeper… for now.  But it’s BLUE!  And I just finished decorating that room in shades of lavender!  What’s a mom to do?  LOL!
blue sleeper

Well, go to the thrift store, of course!  That’s where I got two big rolls of lavender gingham decorating fabric for a dollar each!  I know they look solid in the pic, but really they have a tiny gingham pattern.
 fabric rolls2gingham print

They are the perfect size for twin bedspreads and eventually will be used for that, but for now…

… I’ve wrapped them around the blue co-sleeper for baby girl.
wrap1 wrap2 wrap3 wrap4
wrap5
Super cheap, Super easy way to make this blue baby bed look more girly.
Have a blessed day!
Rebecca

Wednesday, May 26

Little Girl’s Room Wall Border

finished2

The painting is finally done.  The walls I showed you in a previous post, but this week I tried my hand a stenciling.  I’d never successfully stenciled before.  (I gave up the previous time I tried).  It seems to be a precise science to get just the right amount of paint on the brush/roller, then hold the stencil very still while getting paint into tiny holes.  And, spray adhesive on the back of the stencil didn’t work for me on our textured walls.  I’m convinced that if I had flat walls, this would have worked much better.  That’s my excuse anyway, hehe!  I only had one thing going for me when I started this project… DETERMINATION!!!

I picked out a rich purple paint for the border above the chair rail (click here to see that install).  It’s Valspar’s “Purple Frenzy” Interior Satin.  I got the stencil and roller from my favorite craft store – Hobby Lobby.  Also, the spray adhesive that I ended up not using. 
supplies

The stencil package suggested practicing on scrap paper, but I told myself, “what the heck… I can always touch-up any little mistakes.”  SO…. I took a deep breath, and set to work on the actual wall.  Ha Ha HA HA…. Man I’m bad at this….
really bad

Despite the smears and globs, I kept going.  And about ten feet down the wall it started to look a little better.   By the time I got half way around the room it was going pretty smoothly. 
in progress

And by the time I finished the room, well let’s just say the last several feet look pretty darn good!  Yay Me!! last wall2

Of course then I had to go back and completely paint over the most hopeless areas with my wall paint and try again.  repainted

Other areas just needed a little touch-up.
touch up

Super cute!!  I love how this turned out!
completed2

Thinking about doing some more stenciling around the house. :o)

Blessings,
Rebecca

Partying at:
Domestically Speaking's POPP #21

Tuesday, May 18

Little Girl’s Room Curtains


Another item reveal in my little girl room.  Here are the curtains I did.  They were super easy and quick to make.  I thought I might have problems since I added a light-blocking liner, but that turned out pretty simple to add.

finished


I started with long, tone-on-tone, white striped material and added a strip of purple flowered material to the top.

construct1


Then, I added a 5/8 inch grosgrain purple ribbon over the seam.construct2 

Next I added 7/8 inch grosgrain purple ribbons to the top for a tie-on curtain. construct2_5

I used a thin strip of white material across the top for a smooth seam allowance. construct3

This strip was then ironed to the back.construct4 

After cutting a piece of blackout liner to the size of the finished curtain, I laid it on the back of the curtain and folded the sides of the curtain over, tucking under 1/4 inch on the hem.  Then I stitched along the edges.construct5

construct6


I hemmed the bottom by hand using a few whip stitches and tied the curtains onto the curtain rods.  The rods I got at Hobby Lobby for just over $7 each with coupons.  They came in a  kit that included the finials and hanging brackets.  A quick coat of white paint and they were ready to go up.construct6_5 

For the tiebacks, I used strips of the white fabric and put button holes in both ends.

construct7

I found these adorable purple buttons in my stash and tied them onto U-nails I hammered into the wall.  Slipped the tieback around the curtain and put the button through both button holes.

construct9a construct8a

construct9_1

The look is perfect for the room!

construct9_5

It’s purplishous!! There are a few other details I want to add to the room in the coming weeks.  Once I get the furniture back in place I’ll reveal the whole room.  Stay tuned.


Rebecca

Friday, May 14

Little Boy's Room Peg Mirror

I'm back! I've been on sabbatical getting settle in with the new baby and still putting last touches on some previous projects. And since nothing in life REALLY goes smoothly, we've actually been without our satellite internet connection for nearly a month.


Off topic aside:  I’m actually torn between the loss of internet being a bad thing or a good thing.  On one hand, there have been many times when I wanted to find a recipe, research a product, find a coupon, etc.  But on the other hand, it’s been very freeing to not constantly want to sit down at the computer and check email, Facebook statuses, or search for Swagbucks.  I think I have addiction problems.  LOL!  The last few weeks I’ve had so much more time to get stuff done… like finishing the mirror in my little boy room.

finished2

Using the same style and painting technique I used here (notice the bare-edged mirror in the last pic), I spent the last few days framing out an old mirror that was left-over when we built the house. 
To get started, I measured, cut, and painted the boards to frame the outside of the mirror.  Then I attached them directly to the mirror with Liquid Nails.
glue

This stuff is great!  I found mine in the paint department of Home Depot.  It doesn’t set for about 10 minutes, so I had plenty of time to make sure the pieces were level and fit together as a square before they were permanently placed.
constructing
constructing2

Originally the builders had precut the mirror to fit in our master bath and cut out a hole for the outlet too.  But we ended up buying smaller mirrors for each sink and framing them ourselves.  You can see the hole on the right side of the pics above and in the close-up below.  When I decided to repurpose the old mirror in the little boy room, I had to get creative about covering up the hole.
cutout hole2

That’s where the cork tile I salvaged from our old home came in. 
constructing-hole
And to fill the space below it, I added a chalkboard.
I used hardboard to paint my chalkboard onto.  Here is a pic of the hardboard.  (Ignore my messy workshop.)
hardboard

I cut the hardboard down to the size I needed.  Using a few coats of chalkboard paint that I got from Hobby Lobby, I turned it into a small chalkboard.  (That’s the inner frame for the mirror on the right side of the sawhorse.)
chalkboard

Once these pieces were finished, I attached them to the mirror with the Liquid Nails.
constructing right side

I used a small scrap of door casing molding (also left-over from building the house) below the chalkboard to hold the chalk and eraser.
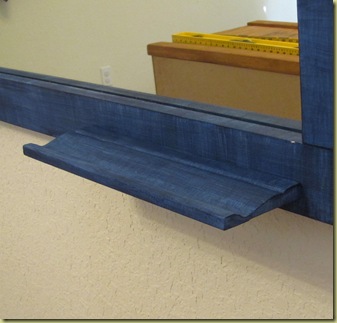
chalk tray

Here it is, finished and ready for my little boy.  Notice in the reflection of the mirror the matching peg strip I showed you in a previous blog.
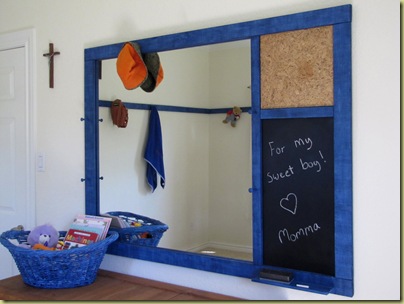
constructing final2

He absolutely loves it!!  I wish I had captured his expression when he came home from preschool and saw it.  Being a Mom is such a fantabulous job to have!

Rebecca

I am sharing this at these fabulous parties!  I love me a good par-tay!!
The Girl Creative
Tools Are For Woman Too!
Making the World Cuter
The DIY Showoff
Just a Girl 
A Soft Place to Land 

LinkWithin

Related Posts with Thumbnails