When I picture the windows open in a room, I imagine warm sunshine streaming through as the wind gently blows the curtains. Fresh air hits me and I am compelled to take a deep breath. The refreshing energy fills my soul. Of course there are only certain seasons when it's practical to open the windows, but my goal is to fill my heart, home, and family with a beautiful serenity that always makes me think the windows are open!
Showing posts with label painting. Show all posts

Monday, March 7

Jumping on Board (and Batten)

It’s my turn to try out the delicious look of the board and batten in my home.  I’ve been stalking any blog post I could find that mentioned it and really loved how easy Karla @ It’s the Little Things and Décor Chick made it sound.  Then I procrastinated for about a century because I was sure the texture on my walls would be too obvious and look awful!

So to help convince myself, I Photoshopped some pics of my walls.


Before - right wall


Photoshopped - right wall
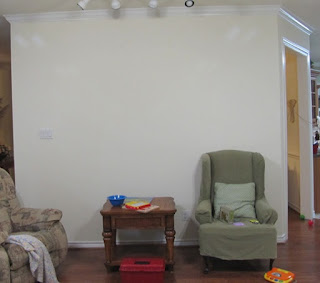


                                    Before - left wall


                        Photoshopped- left wall


(Did I not warn you before that this room is usually covered with toys?) <-- Follow this link for more before pics too.

Still unsure, I cut strips of paper and hung them on the wall.  I’m a very visual person and this really helped me to decide placement and size.  I moved the strips around until I was happy and felt a little more confident.  In the end I decided on 2-1/2 inch wide battens and placed them 16 inches apart - each one on a stud.  By doing this I knew they were evenly spaced and securely attached.  For the header, I picked a 3-1/2 inch wide board.

paper strips

I wanted something more substantial than the lattice board that Décor Chick used.  Instead I chose 3/4 inch thick primed mdf board in the widths I wanted.  Per sqft the price was actually less than the lattice and it was pre-primed!

So, finally I took the plunge and put three coats of semi-gloss white paint on the walls.  There was no turning back.

painted walls

I had pre-painted the battens a few weeks ago.  Then after lying in bed with the flu (and a million episodes of Rehab Addict later) I finally got them nailed up this weekend.  We love them!!!

B&B wall left

B&B wall right

I’m still considering to add a small plate ledge on top to place things on as Karla and Décor Chick did, but I couldn’t wait to show you this completed step in our family room redo!  More ideas in store…

Rebecca

Linking up at...


Making Making The Girl Creative
The DIY Showoff Tip Junkie handmade projects
Domestically Speaking


Saturday, February 12

Chalkboard and Corkboard Cabinet Door

chalkboard corkboard organization

I try to be organized.  I really do.  It just seems like I’m always taking one step forward and two steps back when it comes to keeping things neat and tidy.  One of our (my husband and me both) worst problems is making lists, misplacing them and making more lists.  Then of course we have ten lists all over the house with everything from honey-do’s to groceries to reminders.  And of course there’s overlap between the lists.  Yep it’s bad.

You might think that having a smart phone would help.  But dang it, it’s not smart enough to read my mind!!  I actually have to find the time to input appointments, reminders and such.  Well, today I am making an attempt to at least have ONE place to put lists, important reminders and such.  And best of all, it’s hidden away inside the cabinet.

cabinet door before

Check out the before pic… now that’s keeping it real.  Papers, boxes, you name it, get shoved into any open space when company is coming.  (Oh don’t pretend, you know you do it too!)  Only Martha Stewart keeps the inside of her cabinets neat all the time.  And if you do, wow, I am in awe!!  You are my hero.  Wanna come to my house?  Open-mouthed smile

So this actually turned out to be a pretty easy (as in during nap time) project.
You need:
* a cabinet door
* screw driver to take it off and put it back on
* chalkboard paint
* painter’s tape
* cork board tile
* fabric of choice
* glue

First I took the cabinet off it’s hinges and taped off the area I wanted to paint.  Then I applied the first coat of chalkboard paint (I used three total) and let it dry. 
taped and painted

first coat

Meanwhile, I cut a cork-board tile down to size to fit in the door and a scrap of fabric a few inches larger.

cork tile and fabric

I glued the fabric onto the board with Elmer’s glue, cuz face it, it’s cardboard and fabric.  No need for fancy glue… yet.

glueing fabric to cork tilefabric glued to cork tile
Then I did two more coats of chalkboard paint.  Actually, the first two coats I painted on with a brush to get a good coverage without a lot of overspray.  The third coat I sprayed on so I wouldn’t have brush strokes. It worked marvelously. 

third coat

I used wood glue to attach the covered cork tile to the inside of the door.  You could use Liquid Nails or any other strong glue that’s good with wood.

cork chalkboard door

And here it is with the door re-hung.  LUV IT!!!  Nope, I still haven’t cleaned that cabinet out.  The kids are up from their nap.  No time now.  LOL!
chalkboard cabinet door hung

Little by little I WILL get more organized!
Rebecca

Visit the party at:
Funky Junk's Saturday Nite Special The Lettered Cottage

Friday, July 9

Painted Toadstool

Today I managed to get all three of my little ones to nap at the same time.  So I got to sit down at their craft table to do a craft of my own.  
clipart
I love the look of the red toadstools with white spots and have wanted one for outdoor decor in my garden.  You know, the ones where the fairies live in the children’s stories.  But I couldn’t find any I loved - in the right size - at the right price. 

Instead I found this online and bought some craft paint.original mushrooms


I used Jo-Ann Craft Essentials Gloss Acrylic Paint in “Bright Red” and “White”.  They are durable for outdoor and indoor use.
paint

progress1 progress2 progress3
Ooh I’m all tipsy, excited. I’m loving how this looks.  **drumming fingers on the table… waiting impatiently for the red paint to dry**  Oops, maybe I should go take the clothes out of the washer and put them in the dryer while I wait.  BRB

*            *            *            *            *            *            *            *            *            *

K, I’m back.  Yep today is cloth diaper washing day.  Then after that it’s wash the potty trainer’s sheets for the second time this week.  But hey, gotta love being a mom!

So here it is with the white dots painted on.
white dots

And in it’s new home in my herb bed.
at home

I’m so in love with how this turned out!  And I can’t believe how easy it was.  Mu-ahh!

Rebecca

You can find this party girl at:


CreativeShareWednesdays

Wednesday, May 26

Little Girl’s Room Wall Border

finished2

The painting is finally done.  The walls I showed you in a previous post, but this week I tried my hand a stenciling.  I’d never successfully stenciled before.  (I gave up the previous time I tried).  It seems to be a precise science to get just the right amount of paint on the brush/roller, then hold the stencil very still while getting paint into tiny holes.  And, spray adhesive on the back of the stencil didn’t work for me on our textured walls.  I’m convinced that if I had flat walls, this would have worked much better.  That’s my excuse anyway, hehe!  I only had one thing going for me when I started this project… DETERMINATION!!!

I picked out a rich purple paint for the border above the chair rail (click here to see that install).  It’s Valspar’s “Purple Frenzy” Interior Satin.  I got the stencil and roller from my favorite craft store – Hobby Lobby.  Also, the spray adhesive that I ended up not using. 
supplies

The stencil package suggested practicing on scrap paper, but I told myself, “what the heck… I can always touch-up any little mistakes.”  SO…. I took a deep breath, and set to work on the actual wall.  Ha Ha HA HA…. Man I’m bad at this….
really bad

Despite the smears and globs, I kept going.  And about ten feet down the wall it started to look a little better.   By the time I got half way around the room it was going pretty smoothly. 
in progress

And by the time I finished the room, well let’s just say the last several feet look pretty darn good!  Yay Me!! last wall2

Of course then I had to go back and completely paint over the most hopeless areas with my wall paint and try again.  repainted

Other areas just needed a little touch-up.
touch up

Super cute!!  I love how this turned out!
completed2

Thinking about doing some more stenciling around the house. :o)

Blessings,
Rebecca

Partying at:
Domestically Speaking's POPP #21

LinkWithin

Related Posts with Thumbnails